All posts by NerdMom

Contesting Monday 7/17

Contesting Monday2

So here is the deal. If you are hosting a giveaway or have a post about someone’s giveaway just leave a link. Make sure this link is to the giveaway post itself and not just the blog or it will be deleted. If you listed it last week but your giveaway is still open, list it again! Also, your link must be to something family friendly or it will be deleted.

Before you run off to add your giveaway make sure you go enter the Amazon Gift card giveaway that I am co-hosting! It is for $110!!!

So now you need to add your giveaways and go enter some giveaways! Let them know that Contesting Monday sent you! Make sure you share Contesting Monday with your fans and followers so that they can see all these fabulous giveaways!!

Collage Memo Center

If you are looking for a gift or are just setting up your communications center for the year this collage memo center is a win! Even though we all have planners my kids absolutely having this hanging on the wall. In addition to any appointments, you can put chores and your meal plan on this board along with who is cooking it! Having it all laid out on the wall means you are equipping your children be more successful and maybe not ask you what you are having for dinner.

Ok, I have seen this in a variety of places and can’t remember the first one but… I love the idea of this custom made dry erase memo center!!! Why does this work? Glass is a perfect dry erase material!!! First, you get a cheap collage picture frame (mine was $6 from Walmart).  I also got out my paper cutter, tape runner and scrap book paper collection (which is way too big;).  This collage is 9 holes so I can do more than just the days of the week!

Then you actually need to pick out the papers that you are going to use in each frame. For me, this is the most time-consuming part. But look at the upside, Out of 1 set of papers you can make multiple boards so you just have to choose once;). I went with a fairly gender neutral set here.

Then cut your paper down to fit each frame. 8 of my frames were 4 x 6. So I cut my 12 x 12 in half then each half into thirds. Then label each frame so you know what goes there! I did the 7 days of the week, notes, and shopping list. You could use stamps, letter cutouts or just print the labels on paper. I just used this template for my Memo Board Labels then cut them out and used a tape runner to fix them to the paper!

Then take off the back and prepare to assemble. This is the time to clean your glass!!! Nothing is more annoying than to finish and realize that you have marks on the inside of the glass;). To assemble just put your paper into the frame like a picture. That is really it;).

You can also go the extra mile…. Put a piece of velcro on the side of the frame (where no one can really see) and the dry erase pen too!

Not only is this great to make for yourself but it is a fabulous gift! I mean, how much is a custom memo board worth?

5 Questions to Help Your Students Succeed

5 Questions
They say a little introspection is good for a person, it is an even better practice for a process. A process like homeschooling! At the end of every school year, I meet with each kid (usually on their birthday day out) and have a little chat. It is similar to how you would do an annual review at a job. It gives us some valuable information about our children’s mindsets and their hopes and dreams. While we don’t always do exactly what the kids wish, it does often inform at least the extra things we focus on throughout the academic year.

1)What do you want to learn this year? I feel like you have to start with the blanket question even though you rarely get many answers to it. My kids this year gave some interesting answers. My 14-year-old wants to be a better storyteller. She did a writing course this year but she felt that focused on grammar and now she wants to focus on the art of storytelling.

2)What is 1 historical or scientific event or time period do you want to learn more about? I know that may sound like an odd combination but science discoveries and events often go hand in hand with history. I got a unique answer this year from my 12-year-old son when he said he wants to learn more about the Crimean War. The only thing he knows about it is where it took place. This won’t inform the year’s history but I will put together some books and a little unit study on the Crimean War. I don’t know much about the Crimean except Florence Nightengale and Gallipoli so I am excited to learn about it too.

3)What skill do you want to learn? Skills can be academic or not. Both girls want to learn how to speak Spanish. I also have 2 children who want to learn to make dinner. We also have a smattering of bike riding and photo editing too. These may not all seem academic but they are life skills and are just as important.

4)What is something about school you didn’t enjoy this year? This is their opportunity to voice their complaints. Sometimes your response may be the fact you know they don’t like something but it is just a hard fact. But you may hear something that you can adjust or compromise on. You may also hear something that you didn’t see coming. This is how I found out that my 2nd oldest has been struggling with the process of writing more than the answers back when she was in 2nd grade. I hadn’t realized just how much she was struggling and so we were able to work on some things that really helped her that year.

5)What is one thing (or business idea) you would like to make this year? We are big believers in entrepreneurship and creation, so we ask this as a hope, not a demand. Many years I get an “I don’t know” but sometimes… I actually have some that want to write more blog posts and monetize them.

5 simple questions can give you a lot of insight into the minds of our children. Insight is the thing I think that we parents hope and pray for more than anything. It also can help give you a much happier and more educational academic year!

10 days 2017 button This is part of my series on 10 Days to a Better School Year series! Check out the rest of the series and all the bloggers who are participating in the 10 Days of Tips series.


Adding Sanity with Systems 3 at a Time

As school activities were wrapping up I looked around the mess I live in and was filled with shame. Shame of all the things I have been meaning to get to for the past 6 months and just haven’t had the time. The cabinets you can’t find anything in or the shower that may have a fuzzy monster living in it are just 2 such projects in my life. But I will be ashamed no more! Not just because I am cleaning up some of this projects but because I am putting in systems that will mean that I never have to block out intense cleaning time for them! 

With 4 kids in the family, we have a lot of people and therefore a lot of mess. If I decided to fix everything I have abandoned, well that is a mistake. I get overwhelmed, don’t know where to start, and end up never doing anything. Instead I have found that making a list of 3 at a time is the perfect approached. Don’t do 2 of the 3 and refill your list! Do all 3, breathe for a moment when you are done, give yourself a pat on the back, and then 3 more. Why 3 instead of 1? If you are like me you have different projects in different spots in the house. While 1 job might take you an hour, it might be broken up well so while you are in a specific area of the house you can work on it for just a few minutes.

You projects should start with a cabinet you use everyday or a room or a drawer. Don’t say your room or your garage, keep it bite sized! Let me show you my current 3 projects. 

IMG_20170709_182510164


Tackling the Showers!

We have multiple showers and frankly, mine is the grossest. I had a great system in our last house but is was blown when we moved. I could blame the state of my shower on moving but since that was 2 years ago, that excuse is a little thin. 

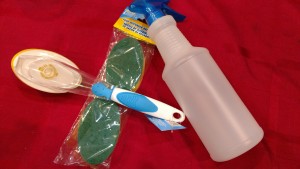
In all seriousness, we have more showers here and 2 of them are the children’s (yes, 1st world problem). I need a system that not only I can keep but my kids can as well. So I visited the Dollar Tree and bought multiple spray bottles and those scrubby sponges with a reservoir. I was even able to pick up scrubby sponges refills. What goes into them is a mixture of  half Dawn and half white Vinegar. The sponge is to tackle any trouble areas that has grossness already. But the spray bottles are my insurance. After showers you shake the bottle and spray your shower. Then get out. It keeps anything from growing so you never have to scrub it again! Success. (I in progress. The materials are on my kitchen counter and got filled when I was waiting for the kids to do something in the kitchen.)

IMG_20170712_142145360

 
The Medicine Cabinet

“Hey we finished a bottle of B Vitamins, I put them on the Costco List!” No one realizes that we have an extra bottle in the back of the medicine cabinet. It was put on the second shelf so you didn’t accidentally use it before the open one. Did I mention that I can’t reach the back of that kitchen shelf, much less the kids? So things were a hot mess in there. First thing I did was pull everything out and threw out everything that was expired. Then I went and had dinner. I came back the next day;). The next thing I did was take out everything that doesn’t belong there. Kids are great for this job. Hand them 1 destinations items at a time or else you are asking for misdelivery;).

Then I containerize! Next time things seem a little wonky it all has a home to belong in. Remember, you don’t need to go buy fancy containers. I have a spot that we keep empty plastic containers. So most of the containers for this project were Dollar Tree purchases but I have an awesome Lego container;). That holds all our current vitamins and we can take it to the table in the mornings. Containers also solve the reach issue. I can reach the basket and don’t have to reach to the back of the shelf. I have a container now on the second shelf that holds all our extra vitamins and medicines!

My Jewelry

I, like many women, have gobs of costume/fake jewelry. So much that it won’t fit in a jewelry box… I actually don’t know that I could ever get my necklaces into a jewelry box and keep them untangled. I have spent so much time over this last year looking through my jewelry. So I have decided to rectify this situation. This is my project of the 3 that I am not even close to finishing yet.  It is such a large job (because I keep a lot of broken or tarnished junk) so I am not doing it in a completely traditional method. 

Normally I say sort then figure out how much of a system you need. Well, this time I have a bit of a system then I am sorting and then I will figure out the whole system. So my first step was hanging chains on my wall in my bedroom horizontally and I bought S hooks. I then took my current (and therefore favorite) necklaces and french loop earrings and hung them up on the chain. Now I am slowly going through the drawer in my nightstand and sorting! I have my “Is it ok to throw this away pile” (What can I say, I have guilt issues. Who cares if it turns my finger green?). Then I have the earrings that I am waiting to find a match on and then I have the stuff I am keeping that can’t go on the chains, like stud earrings. It is a slow process. I am doing an initial sort of brokens but I know that my day of reckoning is coming. When I have to be honest with myself. I will have to get rid of the stuff I will never actually wear again. I will post pictures when I am done!

Imagine all the time you would save if you didn’t have to scrub out your shower? How about if you didn’t have to dig through 5 shirts you hate in order to find something to wear? Imagine how much smoother your school year would go!

So what are your first 3 mini-projects to tackle? Share so we can support each other! 


This is part of my 10 Days to a Better School Year Series! Pop over and check out the rest of my series (and enter the Amazon giveaway!).10 days 2017 button

Christmas Gift Planning

Christmas_wreathDoes Christmas seem to sneak up on you every year? Trust me you are not alone! But, as with most things, there are some strategies that help make Christmas a little more fun, sane and affordable!!!
 
I like to start planning for Christmas in the summer before we start back to school and before the early fall clearance sales start. Here is the first step! A master list!!!
 
1)Make a list of everyone whom you will give a gift to! This includes the faceless/nameless people who will be getting gifts, like Sunday School teachers or regular school teachers who haven’t been assigned yet.
 
2)Put an H by all those you would like to make a homemade gift for or a B for those you know you are going to buy for (this can be subject to change, it is just to give you an idea)
 
3)Put a price range! You can always spend less if you find a great sale but this will keep you from going crazy.
 
4)Put any gift ideas/sizes/etc next to the receiver’s name. If you know they collect something specific or you have a great idea make sure to not it. That way when you see a great sale you don’t have to remember the 2 people in your list of 20 who might like it! And when inspiration hits in the middle of church you can whip out your list and make that note!
 
5)Put the list in your wallet! It does no good if it isn’t with you!!!
 
We can also get a jump on those handmade gits! On another list:
-Make a list of homemade gifts (like cocoa mix, facial scrubs, baskets, etc)
-Star any that can only be made with in a month of giving
-Note how much time each craft will take and if it will take multiple sessions .
 
Supply List is mandatory!!! Make a supply list then you can use JoAnns and Michaels coupons to buy them for a deal! Keep it with your gift list in your wallet/purse!
 
None of this is rocket science but it helps to have someone remind you and lay out a path. So try this method this year and see if your Christmas is a little more enjoyable!!!
 
10 days 2017 button

This is part of my 10 Days to a Better School Year series! Pop over to see the rest of my pieces along with pieces from all the 10 Days of Tips for Homeschool Moms.

Passing Down Chores in 4 Steps

Passing Down Chores


There is 1 tradition that happens in families all over the world when seasons change. We hand things down. Yes, the normal family will go through clothes and toys and pass them down to the youngest child in the family they fit. In our family we have the same tradition with chores. Chore training can be time consuming so the summer is a great time to tackle it!

It takes a lot to make a family go around. Mom and dad can not, and should not, do it all on their own. Many hands make light work, it is proven. Giving our children chores is also good for them. It trains them to take care of themselves and develop an attitude of service. But I don’t think I need to convince you of the virtues of chores. But how often to you evaluate chores? Train for new ones? We all get in a rut and sometimes it is just easier to do it ourselves, at least in the short run. But summer is the perfect time to evaluate who does what chores and who can handle more!

Here in the NerdFamily we fol;low the mentality that the youngest child who is able to do something does it. This frees up the older children to take on more mature responsibilities thus freeing mom and dad to take care of those things that never get done!

There are 3 main areas I break these chores into: laundry, cleaning, and cooking. Each have different levels of responsibility.

Let’s look at the laundry process. The general responsibilities (getting more difficult): putting your clothes away, folding your clothes, running the clothes in the dryer, running the clothes in the washer, sorting the hampers, deciding what loads get run. In our house we start having the kids put their folded clothes in the drawer pretty young. Then we slowly progress them. Right now we have 1 who runs the washer, 2 who can do the dryer, 1 who can sort, and I decide what loads are run. But we are ready to progress.

First: Have a conversation. Talk to the younger child about the fact they are ready to learn something new. Remember that more responsibility may mean more privileges (always a selling point).
Second: Then you have the younger child shadow the older child for an agreed upon time period. During this time they get to ask the older child any questions they want! I even encourage them to take notes if they feel they need it (more of a cooking issue).
Third: The older child will shadow the younger child while the younger child tackles the choir. The older child is there to make sure it gets done correctly but with minimal input from them. Usually I say this goes on until the younger child gets it perfect 3 times.
Fourth: Officially hand this responsibility to the younger child and train the older child to do something new!

That is it! Chore training may take a little time but it will pay off big time all year and for years to come.

10 days 2017 button This is part of my 10 Days to a Better School Year. Make sure you check out my other posts and everyone in the 10 Days of Tips for Homeschool Moms. And enter the giveaway!!!

Planning Now for Caring All Year!

Caring all year2

Now a days it seems all birthday wishes, happy holidays, or congratulations all seem to happen. That is fine but I know I am not alone when I say I wish I did more! Real cards that you receive in the mail are so special so why don’t we do it any more? If you are like me there is just one real reason. Life is so busy that you never get around to it. But a little planning twice a year can make all the difference! 

1)Make a list! Sit down and write a simple list of everyone that you, your spouse, or your kids want to wish a Happy Birthday or anniversary card to (or send a Christmas card to). I take it a step further and put everyone into a spreadsheet  database (that sounds so much dorkier but true) but a spreadsheet will do. I will explain why later.

2)Do a little Facebook stalking. A lot of your friends have birthday and anniversary information already sitting on their Facebook profile. This can add a bit of surprise because they won’t be expecting a real card!

3)Do a first sort of your list! I find that postage is where sending cards (especially Christmas cards) gets expensive. So do a preliminary sort or your list to determine if you are planning on mailing the card or handing it to the person. Something I love about my church is that everyone does Christmas cards but they hand them out on Sundays and in small group! But I don’t see everyone that I want to give a card so some will need to be mailed. I denote this on my database with a simple m or h. 

4)Get the addresses. First get the addresses of everyone that you know you are actually going to mail a card to. Then consider getting everyone else’s just in case you don’t see them around their special days. 

5)Sort again! Now we are going to sort in date order. Then you can see at a glance who has a birthday in September, October, etc. 

6)Print! Now we are going to print off 2 sets of address labels (if you put your list in a computer). 1 set is the labels for birthdays and anniversaries, the second for Christmas. Also print off a list in date order of who has what on what day. If you are just writing your list on paper just know you will still have to hand address envelopes. 

You can stop here or keep going! 

7)Get or make cards! Nothing is worse than wanting to send a birthday card for a guy and only having floral ones! You can order card packs from a variety of places like Amazon or even go to the Dollar Tree. If you get real creative you can make your own. I actually love to do this when I have time. I am actually planning out the Christmas Cards I am planning on making. 

8)Put it all together! You can actually put the cards completely together and sign them. Then tuck them in the envelope, label them, and put postage. They you can put a sticky note on them, put a note in your planner, or write the date in the corner in pencil to help you get them in the mail on time. 

Yes, this all will take you more than a few minutes. The first time you do it will be the most time consuming with building your list. But next time you will just have to update your list with new people in your life and new addresses for those who have moved. 

I know I feel so loved when someone takes the time to give me a card. I want to make the people in my life feel that way too! But if I do it now during the summer it will make it easier to love on everyone all year long! 

10 days 2017 button This is part of my 10 Days to a Better School Year series! Pop over to see what other great posts I have in this series. It is also part of the 10 Days of Tips for Homeschool Moms. Many great bloggers are participating. Pop over to my 10 Days hub to see them all.

10 Days to a Better School Year & a Giveaway

I am so excited that it is time again for a fabulous 10 Day Series!!! You may remember that last year I did the 10 Days of Nerdy Fun in conjunction with a great group of homeschool bloggers. This year there is also an Amazon gift card!

10-days-of-tips-for-hs-moms

Starting July 10th I will be posting a simple thing to do now that will make your school year a little better and a little saner. Most of these posts are not homeschool specific at all but add a little peace to our crazy homeschool lives. I will come add the new links every day (they publish at midnight;).

10 days 2017 button

 1. Planning Now for Caring All Year!

2. Passing Down Chores in 4 Steps

3. Christmas Gift Planning

4. Adding Sanity 3 Systems at a Time

5. 5 Questions to Help Your Students Succeed

6. Collage Memo Center

7. Tackling the “Once in a Whiles” Before School Starts

8. Tech Organization Helps

9. Summer Bucket List

10. Meal Plan for Your Sanity

Before you start taking in all fabulous posts, make sure you enter the giveaway for the $110 Amazon gift card!!! The giveaway starts July 10th, 7am EST – July 21st 11:59pm EST and is open to US and Canadian residents.


Make sure that you check out all the other bloggers who are participating in the 10 Days Series!! Each blogger has their own theme and subject. They are all going to be fabulous!

<
<
<
<

Contesting Monday 6/10

Contesting Monday2

So here is the deal. If you are hosting a giveaway or have a post about someone’s giveaway just leave a link. Make sure this link is to the giveaway post itself and not just the blog or it will be deleted. If you listed it last week but your giveaway is still open, list it again! Also your link must be to something family friendly or it will be deleted.

So now you need to add your giveaways and go enter some giveaways! Let them know that Contesting Monday sent you! Make sure you share Contesting Monday with your fans and followers so that they can see all these fabulous giveaways!!

Contesting Monday 7/3

Contesting Monday2

Happy July! Am I the only person who is shocked that it is already July? Do you have big plans for the 4th? How about we celebrate by winning some giveaways?

So here is the deal. If you are hosting a giveaway or have a post about someone’s giveaway just leave a link. Make sure this link is to the giveaway post itself and not just the blog or it will be deleted. If you listed it last week but your giveaway is still open, list it again! Also your link must be to something family friendly or it will be deleted.

So now you need to add your giveaways and go enter some giveaways! Let them know that Contesting Monday sent you! Make sure you share Contesting Monday with your fans and followers so that they can see all these fabulous giveaways!!